April 7, 2012

CLEANING REAR SEATS pt.2

I forgot to mention about the rear soundproofing.

Here are the seats back in the car, after finally tinting it!

DSC_5568

This sheet smells like shit.

 DSC_5553

After some proper ‘gentle’ washing (look how dirty the water in the washing machine is), the result is a fresh, lemony scent on the sheet.

DSC_5573

the back area has quite some dried mud in it, I wonder what happened in this car’s past.

DSC_5575DSC_5580

Seats now look fresh and young again! Compare them with the front ones which haven’t been cleaned yet. Plus, since the car is tinted now, there’s less worry about heat damaging the soft, supple leather.

Also, the rear seats weigh 27kgs including headrests. :)

March 26, 2012

CHANGING ACCESSORY BELT

As with buying a new old car, certain parts should be changed to prevent the whole thing screwing up. Today I’mma do the accessory/serpentine belt. It’s noticeably worn and cracked.

DSC_5484

As you can see after removing the radiator hose, even for a W126, the 1JZ-GTE is kinda long, and with the extra radiators, there’s not much space left to work with. The nut for the arm is a size 14, use the round headed spanner for this, with a loong metal pipe for leverage. Just be careful of your fingers when you handle the belt.

A quick Google picture search for the engine shows how the belt should run. The new belt is a local made Bando 6PK1920. Can lah…

Look!

DSC_5501 

The old belt, as you can see is at the end of it’s lifespan. It will now retire as a spare in the arse of the beast.

DSC_5503

And here it is with everything back on. The belt is barely visible tho.

March 25, 2012

New Pedals

I’ve been busy with a few projects lately, but they’re unfinished. So, I’ll show you something to keep this place alive.

I got these fancy pedals for only RM3.80!!! It even comes in luxurious packing. There were many choices, but I decided to take these scratched aluminum ones as I imagined they would look the coolest.


RM3.80 Later…

DSC_5412DSC_5416

DSC_5415DSC_5418

Originally the pedals also had some extra wording that I didn’t like, so I used thinner to rub it off. I’m thinking of putting something like a screen protector to protect the chrome & the wordings. A problem with the accelerator pedal though is that it’s much shorter than the original one.

March 13, 2012

CLEANING REAR SEATS

The interior is ghetto. The seats are filthy. Unfortunately, I forgot to take any pictures of the seats in the car.

DSC_4902

This is the only picture I managed to snap of the seats, when viewing the car. I’m starting with the rear seats  because the car still needs to be driven around for some tinting and to get other stuff done. So, here are the leather seats, I’ve already cleaned a part of it, and you can see what a big difference it makes. This ain’t a million dollar ride, so some cheap cleaner can do. I used STP Tuff Stuff, a large can is about RM20 at most car accs shops.

DSC_5270DSC_5271DSC_5274

DSC_5266DSC_5283

Imagine, 30 years of dirt, sweat, farts, other unholy substances… The seats have been baptized and are born again. Not forgetting all the creases, cleaned with more Tuff Stuff and a toothbrush, and a vacuum machine.

DSC_5287DSC_5292

DSC_5280DSC_5281

Overall, I used 1 whole can for the rear seats. After that I massaged them with some leather conditioner that was kinda oily. The whole thing took about 2-3 hours to clean.

I will update with the finished pics once I have gotten the car tinted for the leather’s sake. Seats are currently sitting in a room in the house.

LED INTERIOR ROOM LIGHTS

The original lights were very lousy and barely lit anything up. So I decided that would be the first thing to fix since it is quite simple. However, I wanted to use LEDs just because. These are warm white LEDs, color temp around 4000k. The result is a 2-3 time increase in brightness. :)

Starting out with the front light, I removed the reflectors, bulbs, and bent the copper thingies abit to make space for the LEDs.

DSC_5295DSC_5299DSC_5311

Then I took a piece of holey PCB board and cut it to shape. I bought the LEDs off ebay for less than RM10 each. They come in warm white (4000k) and cool white (6500k). They are DAMN Bright, and uses about 3W of power each.

DSC_5334DSC_5343DSC_5327

DSC_5318DSC_5313

Here is a piece of cardboard being put to good use supporting the PCB board. Also, I’ve decided to paint the board white cause it makes a difference to the overall look (this being a german car I’m being more anal).

DSC_5328DSC_5331DSC_5337

After painting & soldering everything, it looks decent enough.

DSC_5347DSC_5348DSC_5345DSC_5375DSC_5349

Same work done for the rear light. Note the dirtiness before cleaning.

DSC_5366DSC_5370DSC_5350DSC_5373DSC_5372


*I decided to solder the LEDs directly onto the board for better reliability*

DSC_5592DSC_5594

Here is the back with the lights on, pretty much the same as the original but, much much brighter!

DSC_5602DSC_5605

The three circles were unavoidable, but don’t really bother me as much the surroundings (looks like blood splatter).

March 11, 2012

MAJOR UPDATE

It’s been over a year, and may things have happened. None that concerns the reader thou. However, the reason for the blog coming alive again is the new “inventory”. The main ride of this blog is no longer the putra, but a dictator’s car from the 80’s. It’s not mine thou, but I’ll be doing most of the work on it. Also, I’ve bought myself a bike for daily use. Done a few long trips with it.

Let me introduce,

THE BENZ 280SE (no name yet)

There will be alot of work that needs to be done to officially pimp it out. Photos were taken at the time of viewing the car, which was not very long ago. I want to do up the car with the mindset of a 10 year old child. However I cannot as this is not mine.

I would say the car is already 50% completed , as one of the previous owners already changed the engine.

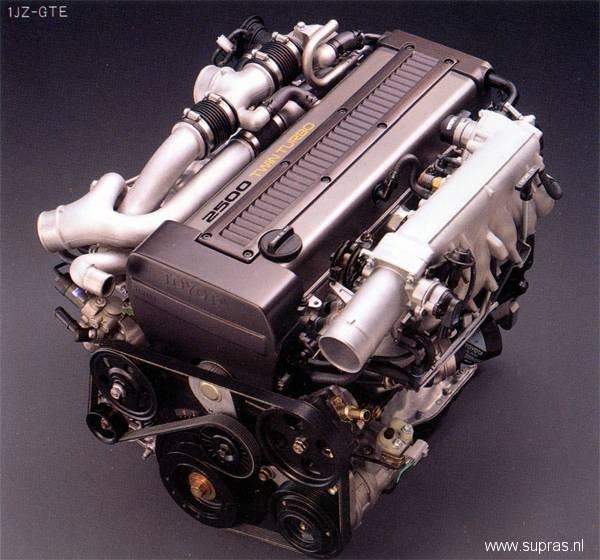
This is what’s powering the car now.

1jzgteb

A 1JZ GTE Twin turbo, for anyone who knows what that is, no further explanation is needed. The car goes from 0-100kmh in about 5-6 seconds now, and saves more gas than the original engine. It is an auto, though it should still be more fun car, a 1.7 ton 300bhp German-Japanese monster. Blow off valves are a must have for this car (psshhhw! psshhhhw!) :D And of course, the interior must be made more gentlemanly, fit enough to accommodate a sir.

DSC_4902 DSC_4906 DSC_4909 DSC_4912 DSC_4916 DSC_4899 DSC_4900


THE NAZA (HYOSUNG) 250 GT

Meh, it’s just my commuter bike, I don’t do much to it so you won’t see many posts about this. Most of the mods were already there when I got it. The bike beside it in the 1st pic is a madass, at the time of writing, I’m selling it off. Didn’t really ride it much, but it is a really cute bike. Best handling ever. :)

 206536_1878114759348_1435629684_31567984_1136203_n 216842_1878115199359_1435629684_31567987_4132727_n